Designing an effective business taxonomy involves facilitating a series of workshops, focus groups, content analyses, and one-on-one interviews. According to Zach Wahl, CEO of Enterprise Knowledge, the result of this approach is “a truly usable design that reflects the needs of your users and your organization.” The outcomes include a set of metadata fields and their corresponding taxonomies. But remember, implementing and maintaining the taxonomy is as important as designing it.
SharePoint is widely used in the private and government sectors for managing content in intranets, document libraries, and other solutions that benefit greatly from tagging content with metadata. SharePoint offers a wide variety of column types to implement metadata fields and their corresponding taxonomies. However, the managed metadata column is one of the most effective means for implementing business taxonomies in SharePoint. Microsoft defines a managed metadata column as a column type that “can be added to lists, libraries, or content types to enable site users to select values from a specific term set of managed terms and apply these values to their content.”
When to Use a Managed Metadata Column
Enterprise Knowledge recommends using a managed metadata column when the metadata field that you are about to create involves either a significantly long list of values, a hierarchical list of values, synonyms for certain values, or all of the above. The managed metadata column offers specific features that help to manage the values in each of the following scenarios:
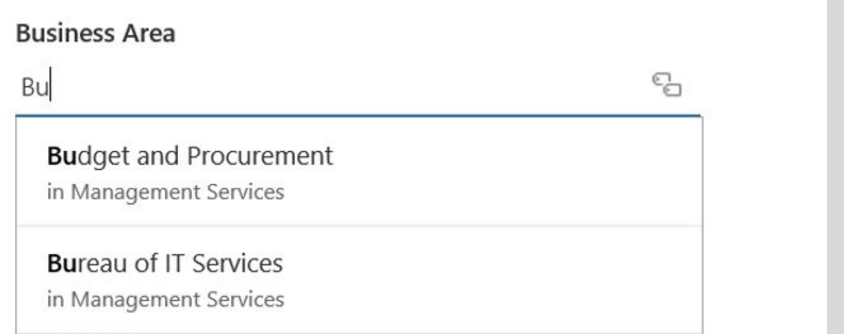
- Auto-Suggestion: When you have a long list of values, this feature becomes very handy for users, as it offers value suggestions or predictions before the user has even finished typing a value. The following illustration shows how the auto-suggestion feature works as the user is typing the Budget and Procurement value for the Business Area metadata field.
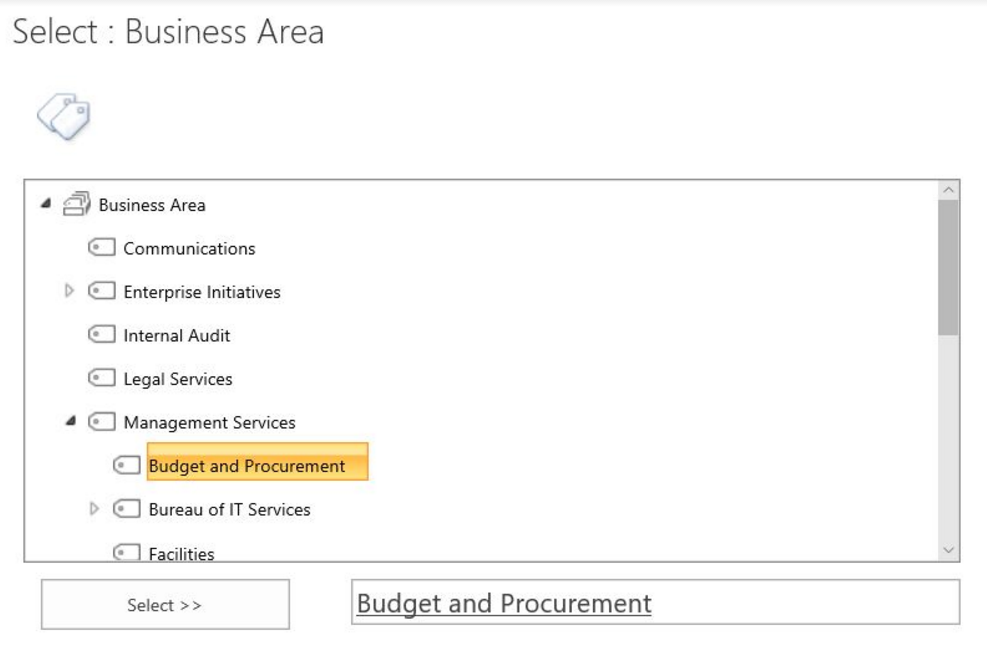
- Tree Control View: If you have a hierarchical list of values – in other words, a list that involves categories and subcategories – the tree control view allows users to browse through the categories more easily. The following illustration shows a sample tree control view for the Business Area metadata field with the Management Services node expanded for the user to select the Budget and Procurement value.
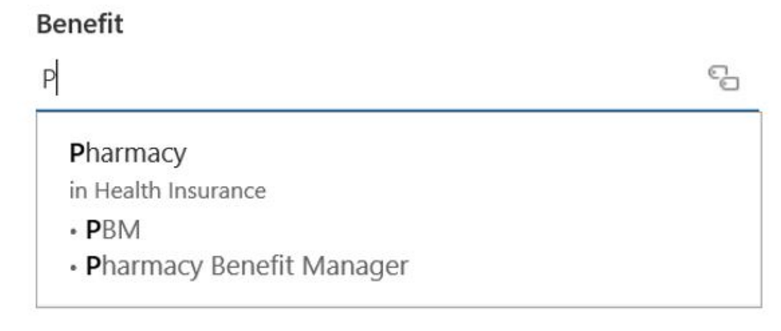
- Synonyms: Lastly, the synonyms feature is very useful when some of the values in the taxonomy have synonyms or acronyms that users could select as alternative words to tag content. In the screenshot below, PBM and Pharmacy Benefit Manager are synonyms of the value Pharmacy. As the user is typing, this feature displays both values and synonyms to help the user make their selection for the Benefit metadata field.
How to Implement a Managed Metadata Column
If you have identified that a managed metadata column is a good fit for your SharePoint project, here is how you can implement it. To create a managed metadata in SharePoint, you need to take the following two steps:
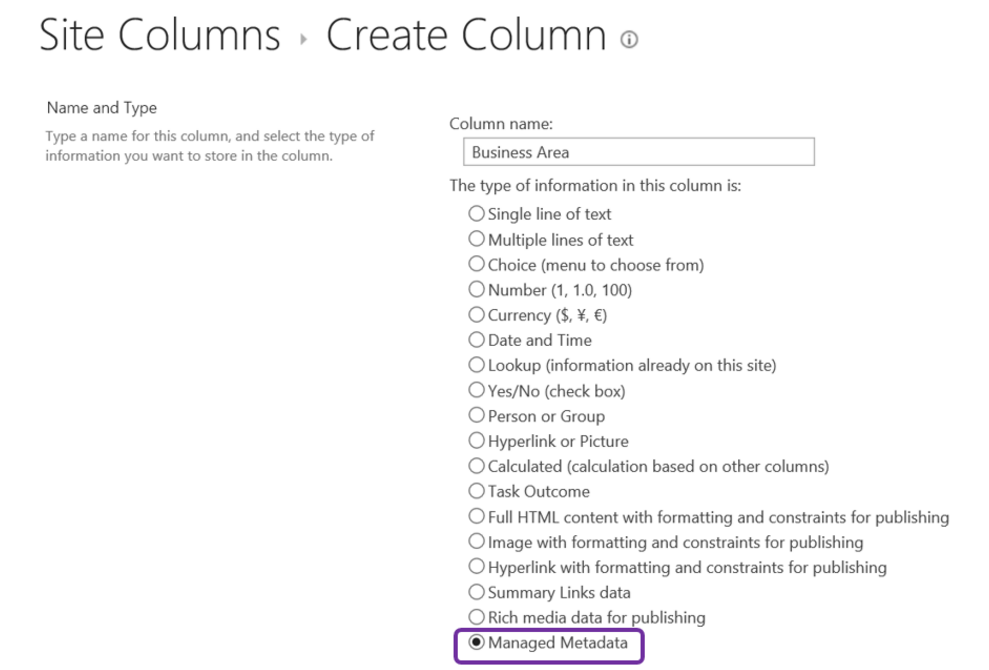
- Step 1: Create a Managed Metadata Column – A managed metadata column is a special column that is linked to a specific term set. Like any other column, it can be can be created from the Site Settings page and can be added to a list or library. To create a new Managed Metadata site column, go to the Site Actions menu, click Site Settings, click Site columns, and then click Create. The screenshot below shows how to select the option to create a managed metadata column when you are creating a site column.
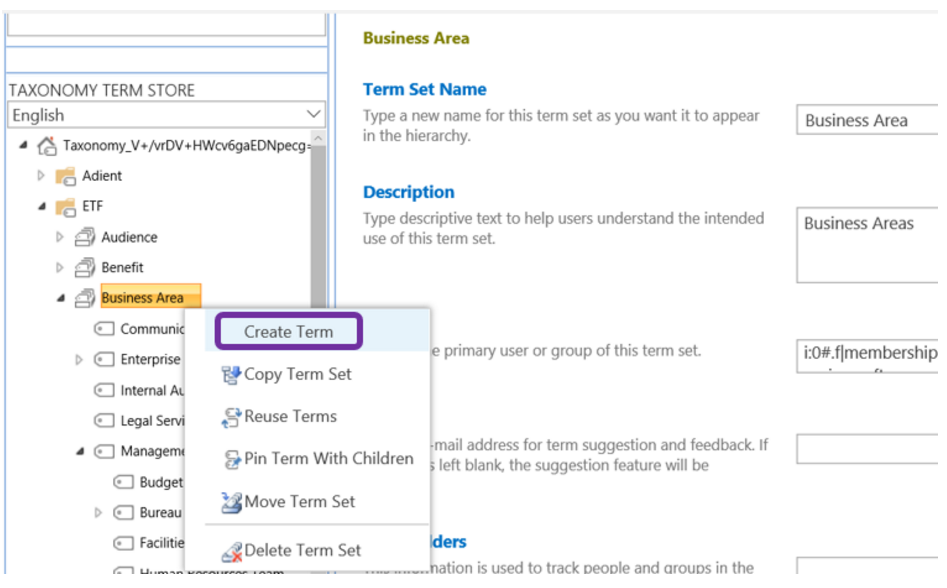
- Step 2: Create a Term Set and Link it to the Managed Metadata Column – A term set is a list of terms that may have a hierarchical structure and it is managed in the Term Store through a tree control view. For security reasons, not everyone has access to the Term Store. To access the Term Store, you need to be either a Farm Administrator, a Term Store Administrator, a Group Manager, or a Contributor for term sets. You can create a term set manually by adding values one at a time or by importing a term set from a spreadsheet based on a .csv template that is available at the Term Store. Importing a term set makes it easier when you have a long list of values for the term set you are about to create. In the example below, a term set called Business Area has been created. Additional terms can be added, if needed, by clicking on the “Create Term” option.
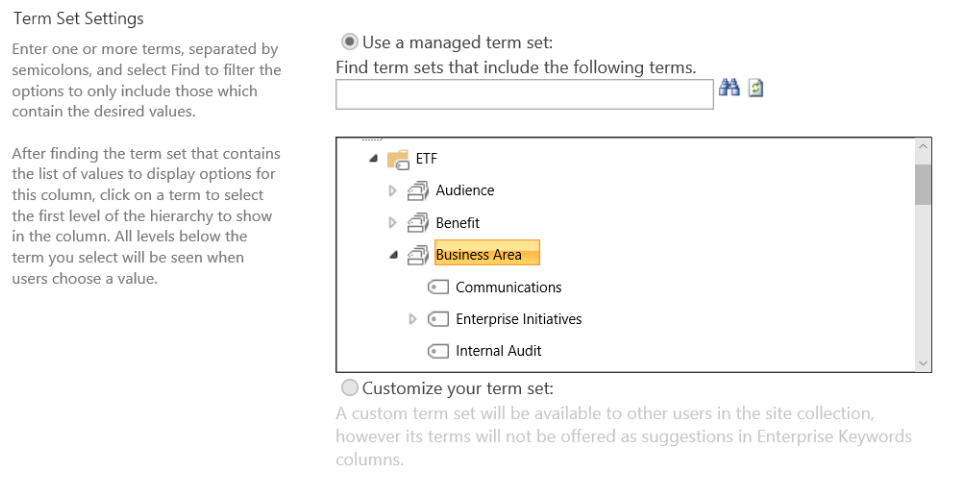
Once you finish creating the term set, you can go back to the managed metadata column and select the term set you just created, which will link the set of values to that specific column. In the example below, the Business Area term set has been selected to be associated with the Business Area managed metadata column.
Critical Decisions When Using a Managed Metadata Column
As you continue configuring your newly created managed metadata column and term set, you will be faced with multiple decisions. Particularly important is the submission policy and the values that will be available for tagging because they will support and significantly improve your taxonomy governance and evolution.
Submission Policy
To implement some kind of governance for the taxonomy, you need determine how you want to manage the values for the term set. You can choose to have a closed submission policy or an open submission policy. A closed term set means that to add new terms, users must have appropriate permissions (e.g. Group Manager or Contributor for term sets). This allows for more control and organized evolution of your taxonomy. An open term set means that any user can add new terms to the column that is mapped to the term set, which may introduce the risk of growing the taxonomy uncontrollably, depending on the purpose of the metadata field. EK recommends using a closed term set, and allow users to make suggestions through a different path (e.g. a feedback log or a taxonomy council). The illustration below shows how to select the type of submission policy for a particular the Term Set.

Values Available for Tagging
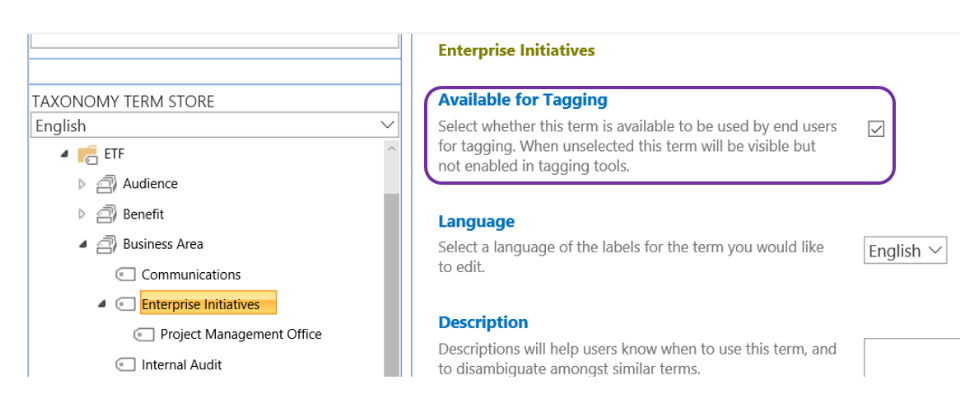
In the Term Store, you can select which terms you want available for tagging. In other words, you may want to allow users to tag content only with the second-level values as opposed to both the first and second levels of the taxonomy. Or you may want to allow them to tag content with any values within taxonomy, in which case you will leave the box checked for all the values. This depends on the purpose of the column and the type of values. For example, you may have a term set called Country, in which the values are organized first by continent (first-level) and then by country (second-level). If you want users to select only countries when tagging content, you can uncheck the “available for tagging” box for the first-level continent values. The illustration below shows the checkbox to make the term Enterprise Initiatives available for tagging within a Term Set called Business Area.
In short, SharePoint’s managed metadata columns and the term store tool offer a lot of options and flexibility for taxonomists to implement and manage their designs, and for organizations to implement and evolve their business taxonomies more efficiently. It is important to keep in mind that not all metadata fields are good candidates for managed metadata columns. You may want to consider other options, such as a choice column, before deciding on a managed metadata column. For more information and detailed steps on how to create managed metadata columns, refer to the following Microsoft articles: “Introduction to Managed Metadata” and “Create a Managed Metadata column“.
If you need help with designing a business taxonomy for your organization or implementing it in SharePoint, contact Enterprise Knowledge. Our taxonomists and SharePoint experts will work with you on a successful solution.
